Glutes · Home, no equipment
Single-leg glute bridge: training one hip at a time
The single-leg glute bridge takes the two-footed bridge and removes one foot from the floor, so each hip has to do its own work without help from the other side.
- Primary
- Glutes
- Secondary
- HamstringsAbs
- Level
- Intermediate
- Type
- Compound · One side, then the other
- Sets × reps
- 3 × 10-12 reps per side
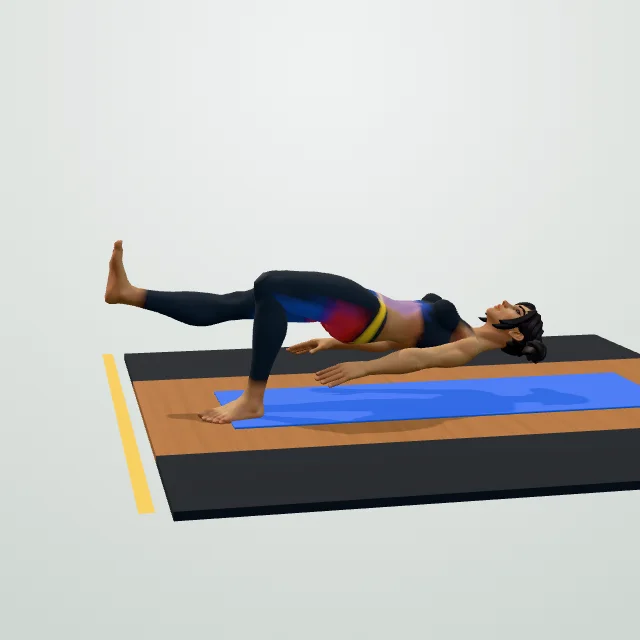
How to do it
- Lie on your back, knees bent, feet flat on the floor.
- Brace your core, then lift one foot off the floor.
- Drive through the planted heel and raise your hips, keeping them level.
- Stop once your hips are fully extended and level, matching a two-leg bridge height.
- Lower under control without letting your hips dip to one side.
- Complete all reps on one side, then switch legs.
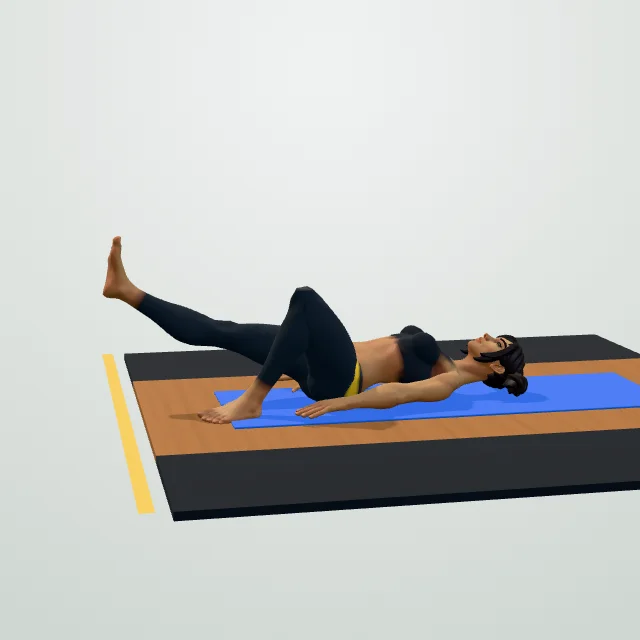
Coach cues
- Keep your hips level, no rotating.
- Drive through the planted heel.
- Squeeze the working glute at the top.
- Lower slowly, stay controlled.
Breathing: Breathe out as you lift your hips and squeeze, breathe in as you lower back down under control.
Common mistakes
Make it easier / Make it harder
Sets and reps by goal
| Goal | sets | reps | Rest |
|---|---|---|---|
| Strength | 4–5 | 3–6 | 2–4 min |
| Muscle growth | 3–4 | 6–12 | 90–150 s |
| Endurance | 2–3 | 15–25+ | 30–60 s |
The single-leg glute bridge is a step up from the standard glute bridge: one foot stays planted on the floor while the other leg extends or stays lifted, so all the hip-extension work and all the balance demand lands on one side at a time.
Muscles worked and why it is harder than it looks
The working glute and hamstring have to extend the hip alone, while your abs and lower back work overtime to stop your pelvis from rotating or tilting toward the unsupported side. That anti-rotation demand is the real difference from the two-leg version — it is common to feel your standing-side glute working much harder than expected, and to notice one side is clearly weaker than the other.
Benefits
Training one hip at a time exposes and helps correct left-right strength differences that a double-leg bridge or squat can hide, since a stronger side can quietly take over in any bilateral exercise. It also builds the hip control that carries over to single-leg sports movements — running, stairs, lunges — and needs no equipment, making it a useful home progression once the standard glute bridge feels easy.
Technique in detail
Start in a standard bridge position, then lift one foot off the floor, keeping that knee bent toward your chest or the leg straight out — either works, straight leg is slightly harder for balance. Keep your hips level: it is easy to let the unsupported side dip or rotate open, which quietly shifts work back onto the standing leg. Drive through the planted heel, squeeze the glute on that side, and stop once your hips are level and fully extended, matching the height you would reach on both feet. Lower with control and complete all reps on one side before switching.
How to program it
3 sets of 10–12 reps per side is a common starting dose, keeping 1–2 reps in reserve so your hips stay level throughout the set — quality drops fast once you start compensating. If one side is clearly weaker, do an extra set on that leg only, a simple way to close a strength gap over a few weeks. It pairs well in a session with hip thrusts or cable pull-throughs as an accessory, or on its own as a home glute finisher.
Progressions: from assisted to loaded
If a full single-leg rep is too hard at first, keep the lifted foot resting lightly on the floor for light support while you build the pattern, or reduce the range slightly. Once bodyweight reps feel controlled and level, add a dumbbell across your hips, or slow the tempo down (a 3-second lower) to increase the challenge without any extra equipment. For a full return to two-leg loading, the barbell hip thrust lets you load both hips heavily once single-leg strength is balanced.
Single-leg vs. double-leg glute bridge
A double-leg glute bridge is the right starting point for almost everyone: it is easier to control, lets you focus purely on the hip-extension pattern, and is a safe way to warm up before heavier lifts. The single-leg version is a progression, not a replacement — reach for it once double-leg bridges feel easy and controlled for 3 sets of 15 or more, or when you want to specifically address a side-to-side imbalance you have noticed in squats or lunges. If you train legs or glutes twice a week, it is reasonable to keep both versions in rotation: the double-leg bridge as a quick warm-up, and the single-leg version as a dedicated working set later in the session.
Safety notes
Keep the movement slow and controlled — this is a balance exercise as much as a strength one, and rushing it is how the lower back takes over from the hips. Anyone with hip or sacroiliac joint pain should build up through the standard two-leg bridge first and check with a physiotherapist before progressing. Stop if you feel sharp pain in the hip or lower back rather than a muscular burn in the glute.
Workout plans with this exercise
More exercises for glutes
Questions people ask
What muscles does the single-leg glute bridge work?
How do you do a single-leg glute bridge?
Is the single-leg glute bridge harder than the regular glute bridge?
How do I make the single-leg glute bridge easier?
How do I make the single-leg glute bridge harder?
Can the single-leg glute bridge fix a weaker side?
How many single-leg glute bridges should I do?
General fitness information, not medical advice. Check with a doctor or physiotherapist before starting if you have a health condition, an injury or are pregnant. Stop if you feel chest pain, dizziness or sharp pain.