Back · Home or gym
Inverted row: a bodyweight row anyone can scale
Lie under a bar with your body straight and pull your chest up to it — a horizontal pulling exercise you can make easier or harder just by moving your feet.
- Primary
- Upper backLats
- Secondary
- BicepsRear deltsAbs
- Level
- Beginner
- Type
- Compound · Both sides together
- Sets × reps
- 3 × 8-12 reps
How to do it
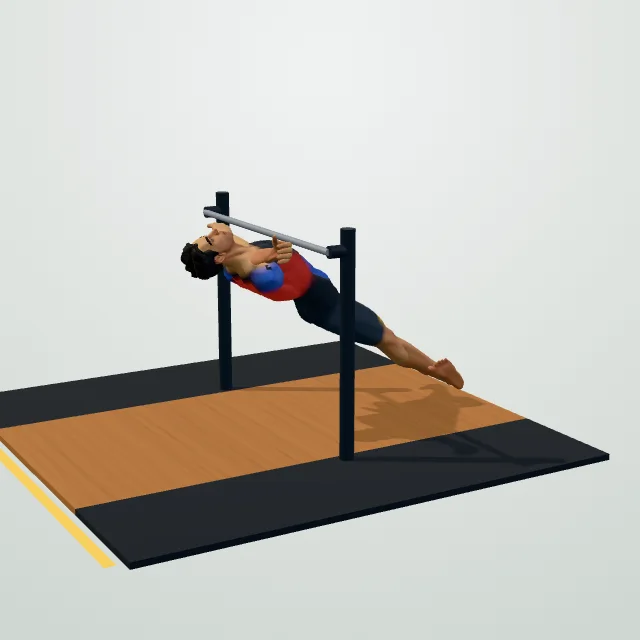
- Set a bar at hip height and lie underneath it, gripping slightly wider than shoulder-width.
- Straighten your body into one line from heels to shoulders.
- Squeeze your shoulder blades together, then pull your chest to the bar.
- Keep your hips locked in place; do not let them sag or pike.
- Lower back to straight arms under control and repeat.
Coach cues
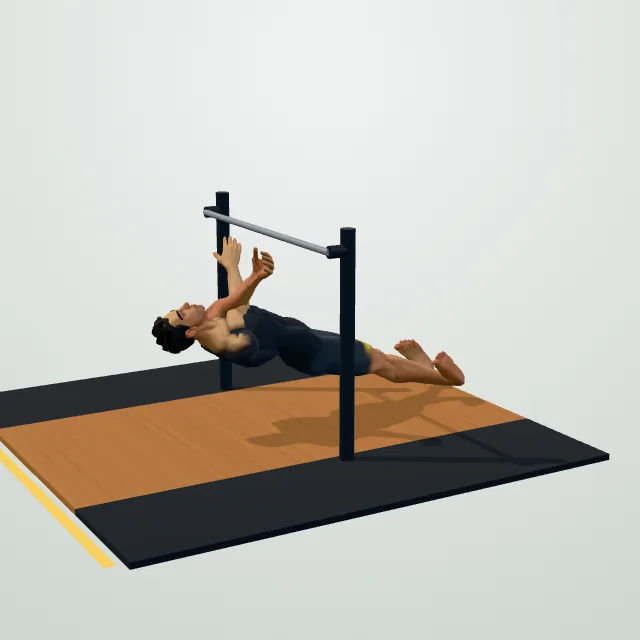
- Body straight, heels to shoulders.
- Squeeze your shoulder blades first.
- Pull your chest to the bar.
- Keep your hips locked, no sagging.
Breathing: Breathe in as you hang at the bottom, breathe out as you pull your chest to the bar.
Common mistakes
Make it easier / Make it harder
Sets and reps by goal
| Goal | sets | reps | Rest |
|---|---|---|---|
| Strength | 3–5 | 3–6 | 2–4 min |
| Muscle growth | 3–4 | 6–12 | 90–150 s |
| Endurance | 2–3 | 15–20 | 30–60 s |
What muscles does the inverted row work
The prime movers are your upper back and lats — the muscles that pull your shoulder blades together and your arms down toward your torso. Your biceps assist by bending the elbow, your rear delts help finish the pull, and because your whole body is held rigid from heels to head, your abs and glutes work isometrically the entire set just to stop your hips from sagging. That full-body bracing is what separates a good inverted row from a sloppy one — if your hips drop, you lose most of the back activation and turn it into an arm pull.
Benefits
Because the exercise is self-limiting by body angle rather than by a fixed weight, it is genuinely useful for a complete beginner and can still challenge someone who already does weighted pull-ups, just at a different foot position. It is also one of the few compound back exercises that needs almost no equipment — a low bar in a squat rack, gymnastic rings, a sturdy table, or even a doorframe row setup at home can all work.
Technique: body angle, grip and pull
Set a bar at roughly hip height in a squat rack or on a Smith machine. Lie underneath it and grip slightly wider than shoulder-width, then straighten your body into one rigid line from your ankles through your shoulders, with your heels on the floor and your body hanging below the bar. Squeeze your shoulder blades together first, then pull your chest to the bar by driving your elbows back and down — think about pulling your chest to the bar, not just bending your arms. Lower back to a straight-arm hang under control, keeping your hips locked in place the whole time; the moment your hips sag or pike up, the tension shifts away from your back.
Your feet position sets the difficulty: with knees bent and feet flat, more of your weight rests through your heels and the row is easier; with legs straight and heels on the floor or up on a bench, more of your bodyweight hangs from your arms and the row gets harder. Start at whichever angle lets you complete 8–12 reps with a straight body and a full chest-to-bar range.
Inverted row vs pull-up
Both train your back through a similar pulling pattern, but the inverted row is horizontal and scales by body angle, while the pull-up is vertical and scales only by adding or removing bodyweight support. Many programs use the inverted row as a stepping stone toward a first pull-up, or keep using it long-term as a lighter, joint-friendly alternative on high-volume days.
How to program the inverted row
3–4 sets of 8–12 reps, resting 60–90 seconds, works well as either a main pulling exercise for beginners or an accessory alongside heavier rows for more advanced lifters. Pick a body angle where the last 2–3 reps are genuinely hard but your form stays straight — if your hips are sagging by rep 6, you have chosen an angle that is too difficult. It fits naturally into a full-body beginner workout or a back and biceps session.
Variations for home and no equipment
At home, a sturdy table edge, two chairs with a broom handle, or a doorframe row setup can all substitute for a bar. A resistance band row anchored to a door is a good alternative if nothing sturdy enough to hang your bodyweight from is available. To make it harder without adding weight, elevate your feet on a chair or bench, or pause for 1–2 seconds with your chest touching the bar.
Safety
Check that whatever bar or table you are pulling on can actually hold your bodyweight before committing to a full rep — this is the main real risk with home setups. Keep your neck neutral rather than craning it toward the bar, and stop if you feel pinching in the front of the shoulder rather than normal muscle fatigue in your back.
Questions people ask
What muscles does the inverted row work?
Is the inverted row a good beginner exercise?
Inverted row vs pull-up: which should I do first?
Can I do an inverted row at home with no equipment?
How do I make inverted rows harder without adding weight?
Why do my hips sag during inverted rows?
General fitness information, not medical advice. Check with a doctor or physiotherapist before starting if you have a health condition, an injury or are pregnant. Stop if you feel chest pain, dizziness or sharp pain.